Нам понадобится:
Ссылочка на Arduino uno: http://ali.ski/gC_mOa
Ссылочка на контактные провода: http://ali.ski/Exjr3
Ссылочка на модуль SD card: http://ali.ski/1rtu8p
Прежде чем приступить к материалу, я Вас попрошу, если нравится то, что я делаю и хотите следить за моей деятельностью, то рекомендую подписаться на мой телеграмм канал: https://t.me/ypavla
Там я публикую новости о вышедших видео, статьях и разные устройства для умного дома и не только показываю.
Спасибо за внимание, теперь продолжим.
В данном примере мы рассмотрим работу с SD картой. Попробуем записать в карту какие нибудь значения. Например слово Hello World.
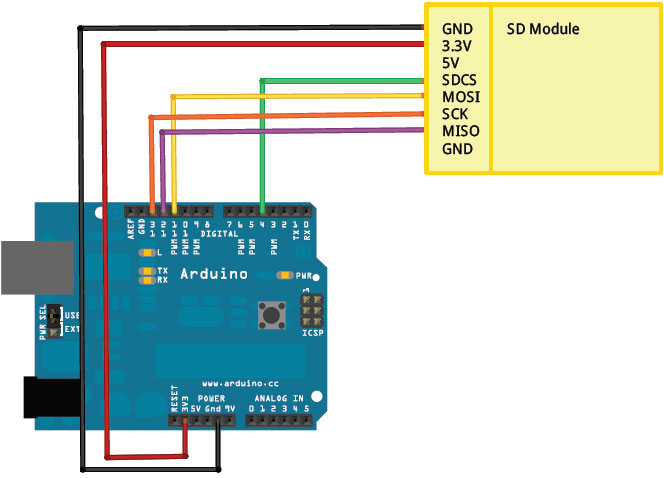
схема подключения карты к ардуино:
** MOSI – pin 11
** MISO – pin 12
** CLK – pin 13
** CS – pin 4 (for MKRZero SD: SDCARD_SS_PIN)
Пример данного скетча Cardinfo есть в стандартных примерах в программе Arduino IDE. Он показывает какого объема наша карта.
/*
SD card test

This example shows how use the utility libraries on which the'
SD library is based in order to get info about your SD card.
Very useful for testing a card when you're not sure whether its working or not.

The circuit:
* SD card attached to SPI bus as follows:
** MOSI - pin 11 on Arduino Uno/Duemilanove/Diecimila
** MISO - pin 12 on Arduino Uno/Duemilanove/Diecimila
** CLK - pin 13 on Arduino Uno/Duemilanove/Diecimila
** CS - depends on your SD card shield or module.
Pin 4 used here for consistency with other Arduino examples
created 28 Mar 2011
by Limor Fried
modified 9 Apr 2012
by Tom Igoe
*/
// include the SD library:
#include <SPI.h>
#include <SD.h>

// set up variables using the SD utility library functions:
Sd2Card card;
SdVolume volume;
SdFile root;

// change this to match your SD shield or module;
// Arduino Ethernet shield: pin 4
// Adafruit SD shields and modules: pin 10
// Sparkfun SD shield: pin 8
// MKRZero SD: SDCARD_SS_PIN
const int chipSelect = 4;

void setup() {
// Open serial communications and wait for port to open:
Serial.begin(9600);
while (!Serial) {
; // wait for serial port to connect. Needed for native USB port only
}
Serial.print("\nInitializing SD card...");

// we'll use the initialization code from the utility libraries
// since we're just testing if the card is working!
if (!card.init(SPI_HALF_SPEED, chipSelect)) {
Serial.println("initialization failed. Things to check:");
Serial.println("* is a card inserted?");
Serial.println("* is your wiring correct?");
Serial.println("* did you change the chipSelect pin to match your shield or module?");
return;
} else {
Serial.println("Wiring is correct and a card is present.");
}

// print the type of card
Serial.print("\nCard type: ");
switch (card.type()) {
case SD_CARD_TYPE_SD1:
Serial.println("SD1");
break;
case SD_CARD_TYPE_SD2:
Serial.println("SD2");
break;
case SD_CARD_TYPE_SDHC:
Serial.println("SDHC");
break;
default:
Serial.println("Unknown");
}

// Now we will try to open the 'volume'/'partition' - it should be FAT16 or FAT32
if (!volume.init(card)) {
Serial.println("Could not find FAT16/FAT32 partition.\nMake sure you've formatted the card");
return;
}
// print the type and size of the first FAT-type volume
uint32_t volumesize;
Serial.print("\nVolume type is FAT");
Serial.println(volume.fatType(), DEC);
Serial.println();

volumesize = volume.blocksPerCluster(); // clusters are collections of blocks
volumesize *= volume.clusterCount(); // we'll have a lot of clusters
volumesize *= 512; // SD card blocks are always 512 bytes
Serial.print("Volume size (bytes): ");
Serial.println(volumesize);
Serial.print("Volume size (Kbytes): ");
volumesize /= 1024;
Serial.println(volumesize);
Serial.print("Volume size (Mbytes): ");
volumesize /= 1024;
Serial.println(volumesize);
Serial.println("\nFiles found on the card (name, date and size in bytes): ");
root.openRoot(volume);

// list all files in the card with date and size
root.ls(LS_R | LS_DATE | LS_SIZE);
}
void loop(void) {

}
Второй скетч ReadWrite тоже стандартный пример, служащий как понятно из названия для чтения и записи на карту
/*
 SD card read/write

 This example shows how to read and write data to and from an SD card file
 The circuit:
 * SD card attached to SPI bus as follows:
 ** MOSI - pin 11
 ** MISO - pin 12
 ** CLK - pin 13
 ** CS - pin 4 (for MKRZero SD: SDCARD_SS_PIN)

 created Nov 2010
 by David A. Mellis
 modified 9 Apr 2012
 by Tom Igoe

 This example code is in the public domain.

 */

#include <SPI.h>
#include <SD.h>

File myFile;

void setup() {
 // Open serial communications and wait for port to open:
 Serial.begin(9600);
 while (!Serial) {
 ; // wait for serial port to connect. Needed for native USB port only
 }


 Serial.print("Initializing SD card...");

 if (!SD.begin(4)) {
 Serial.println("initialization failed!");
 return;
 }
 Serial.println("initialization done.");

 // open the file. note that only one file can be open at a time,
 // so you have to close this one before opening another.
 myFile = SD.open("test.txt", FILE_WRITE);

 // if the file opened okay, write to it:
 if (myFile) {
 Serial.print("Writing to test.txt...");
 myFile.println("testing 1, 2, 3.");
 // close the file:
 myFile.close();
 Serial.println("done.");
 } else {
 // if the file didn't open, print an error:
 Serial.println("error opening test.txt");
 }

 // re-open the file for reading:
 myFile = SD.open("test.txt");
 if (myFile) {
 Serial.println("test.txt:");

 // read from the file until there's nothing else in it:
 while (myFile.available()) {
 Serial.write(myFile.read());
 }
 // close the file:
 myFile.close();
 } else {
 // if the file didn't open, print an error:
 Serial.println("error opening test.txt");
 }
}

void loop() {
 // nothing happens after setup
}
Демонстрация работы данной программы можно увидеть в видео приведенном в конце статьи.
